Login Form in CodeIgniter
0 4588
- In this tutorial, we will learn how to create a login form in Codeigniter.
- First of all, we check whether the user is registered or not by checking his email id in the database.
- If an Email ID exists in the database then we check the password and in case of a match, redirect the user to the dashboard or welcome page.
Related Topics:
Codeigniter Interview Questions
Create Registration form in CodeIgniter
Update Database record in CodeIgniter
Creating a Login Form
Here are few steps to create a simple login form.
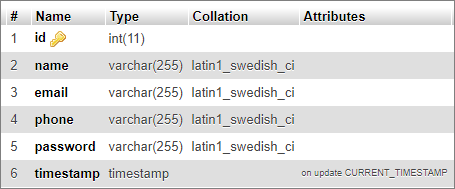
Step 1 Create a table in the database for data validation. In this example, we will use the user table.
Structure of user table:

Step 2 Open the application/views directory and create a view file login_view.php which contains the login form.
login_view.php
<!DOCTYPE html>
<html>
<head>
  <meta name="viewport" content="width=device-width, initial-scale=1">
  <link rel="stylesheet" href="https://maxcdn.bootstrapcdn.com/bootstrap/3.4.1/css/bootstrap.min.css">
  <script src="https://ajax.googleapis.com/ajax/libs/jquery/3.5.1/jquery.min.js"></script>
  <script src="https://maxcdn.bootstrapcdn.com/bootstrap/3.4.1/js/bootstrap.min.js"></script>
</head>
<body>

<div class="container">
  <h2>Login Form</h2>
  <?php echo @$message; ?>
  <form method="post" enctype="multipart/formdata" style="width:40%">
    <div class="form-group">
      <label for="username">Enter Email ID or Contact Number:</label>
      <input type="text" class="form-control" name="username" placeholder="Enter Email ID">
    </div>

	<div class="form-group">
      <label for="passsword">Enter Password:</label>
      <input type="password" class="form-control" name="password" placeholder="Enter Password">
    </div>

    <input type="submit" name="login" class="btn btn-success" value="Login"/>
  </form>
</div>

</body>
</html>
Step 3 Open the application/models and create a model file Login_model.php.
Login_model.php
<?php
class Login_model extends CI_Model
{
	function check_data($username,$password)
	{
	$query=$this->db->query("select * from user where (email='".$username."' or phone='".$username."')");
		$row = $query->num_rows();
		if($row)
		{
		$res=$query->result_array();
		$email=$res[0]['email'];
		$phone=$res[0]['phone'];
		$query=$this->db->query("select * from user where (email='".$email."' and phone='".$phone."') and password='$password'");
		$row1 = $query->num_rows();
		 if($row1){
			redirect('http://localhost/ci/index.php/Login_controller/welcome');
		 }else{
			$data['message']="<h3 style='color:red'>Password is not correct.</h3>";
            $this->load->view('login_view',@$data);
		 }
		}
		else
		{
		$data['message']="<h3 style='color:red'>This user is not registered</h3>";
        $this->load->view('login_view',@$data);
		}


		}

}
Step 4 Open the application/views directory and create another view file welcome_view.php for the dashboard page.
welcome_view.php
<!DOCTYPE html>
<html>
<head>
  <meta name="viewport" content="width=device-width, initial-scale=1">
  <link rel="stylesheet" href="https://maxcdn.bootstrapcdn.com/bootstrap/3.4.1/css/bootstrap.min.css">
  <script src="https://ajax.googleapis.com/ajax/libs/jquery/3.5.1/jquery.min.js"></script>
  <script src="https://maxcdn.bootstrapcdn.com/bootstrap/3.4.1/js/bootstrap.min.js"></script>
</head>
<body>

<div class="container">
  <h2>Welcome to Dashboard</h2>
</div>

</body>
</html>
Step 5 Open the application/controllers directory and create a new controller file Login_controller.php.
Login_controller.php
<?php
class Login_controller extends CI_Controller
{
	public function __construct()
	{
	parent::__construct();
	$this->load->database();
	$this->load->helper('url');
	$this->load->model('Login_model'); ///load model
	}

	public function index()
	{

		if($this->input->post('login'))
		{
		$username=$this->input->post('username');
		$password=$this->input->post('password');

		$this->Login_model->check_data($username,$password);

	}else{
	$this->load->view('login_view');
	}
	}

	public function welcome(){
		$this->load->view('welcome_view');
	}
}
?>
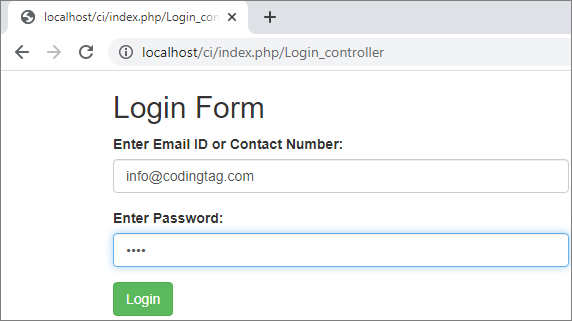
Step 6 Now enter the given URL into your browser to check the working.
http://localhost/ci/index.php/Login_controller


Share:


Comments
Waiting for your comments